Table of Contents
Concrete Slump Test
The workability or consistency of the concrete mix prepared at the building site or in a laboratory is determined using a slump test, also known as the concrete slump test or a slump cone test.
To ensure that the concrete is of consistent quality throughout the construction process, a slump test is performed on each batch.
It is the most basic, least costly, and quickest approach to assess whether or not the concrete is workable. As a result, since 1922, it has been often used for workability testing.
The slump test is performed in accordance with the process described in ASTM C143 in the US, EN 12350-2 in Europe, and IS 1199:1959 in India.
Although other elements, including material qualities, mixing techniques, dosage, admixtures, and so on, also have an impact on the slump value, it is typically used to assess the workability of concrete and shows the water-cement ratio.
What does slump Mean?
Concrete’s “slump” describes how fluid it is when it is fresh and before it sets; Concrete is more fluid when the slump is higher.
Despite having a complicated name for a seemingly difficult operation, it is actually pretty straightforward.
The word “slump,” which typically refers to the act of slouching or sinking, may seem a little out of place when used in reference to concrete,
but it’s actually rather appropriate because it’s used to test how much a pile of concrete slumps when left to stand!
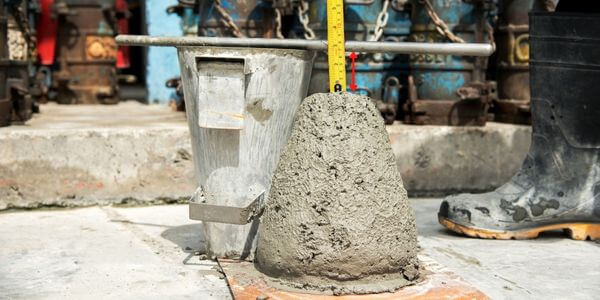
A sample of concrete is placed within a cone for the test, which is then removed to determine how much the concrete has slumped.
There are numerous varieties of concrete, so it’s critical to understand whether the one you’re using is appropriate for the particular job.
The “slump” of the concrete is one essential factor to consider; continue reading to learn more about it and how it affects your work.
Factors affecting the concrete slump test include:
- Material properties such as moisture content, fineness, chemistry, particle size distribution, and temperature of cementitious materials. The aggregates’ moisture content, combined grading, texture, size, and cleanness.
- Dosage, kind, combination, interaction, order of addition, and effectiveness of chemical admixtures
- concrete’s air content
- the temperature of the concrete,
- concrete batching, mixing, and transportation techniques,
- concrete sampling, slump testing methods, and test apparatus conditions,
- Free water quantity present in the concrete.
- Time from the concrete mixing at the moment of testing.
Apparatus Needed for Slump Test
Mold for the slump test, consisting of a non-porous base plate, a slump cone, a measurement scale, and a tamping rod.

The test mold is a frustum of a cone with dimensions of 30 cm in height, 20 cm in width at the bottom, and 10 cm at the top. The tamping rod is made of steel, 60 cm long, 16 mm in diameter, and rounded on one end.
Principles of the Concrete Slump Test
The outcome of the slump test serves as an indicator of how a compacted, inverted concrete cone would behave when subjected to gravity.
It evaluates the consistency or wetness of the concrete, which provides information on the mix’s workability.
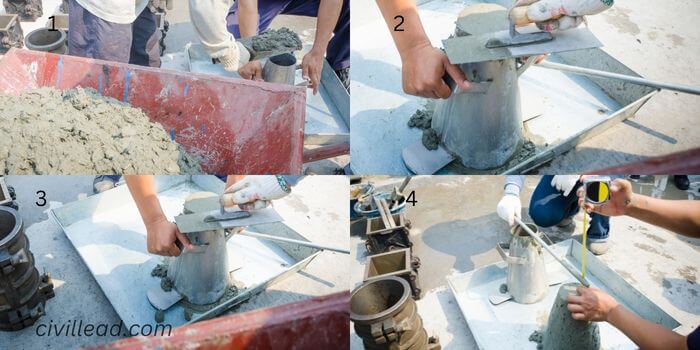
Procedure
- Clean the mold’s inside surface and apply oil.
- Place the mold on a flat, smooth surface that is free of pores.
- Pour the prepared concrete mix into the mold in four roughly equal levels.
- Over the mold’s cross-section, tamp per layer with 25 uniform strokes with the tamping rod’s rounded end. The tamping should pierce the base layer for the next layers.
- With a trowel, remove any extra concrete and level the surface.
- Remove any water or mortar accumulated between the mold base plate.
- Lift the mold slowly and vertically from the concrete as soon as possible.
- Calculate the droop as the difference between the mold’s height and the height of the test specimen.
NOTE: Within two minutes of the sampling, the aforementioned procedure should be performed in a location free from shock or vibration.
Slump Value Observation
During the test, the specimen’s slump (vertical settlement) measurement must be documented in terms of millimeters of subsidence.
| Workability | Compaction Factor | Slump (mm) |
|---|---|---|
| Very Low | 0.78 | 0 – 25 |
| Low | 0.85 | 25 – 50 |
| Medium | 0.92 | 50 – 100 |
| High | 0.95 | 100 – 175 |
Result
For the given sample, slump = ….. mm. The concrete slump shapes that can be seen during the slump test include the following:
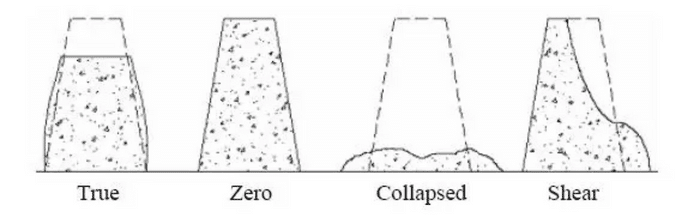
True Slump
The only kind of slump that the test can evaluate is a true slump. After the cone has been removed, as illustrated in figure 1, the measurement is made between the cone’s top and the top of the concrete.
Zero Slump
Zero slump is a sign of an extremely low water-to-cement ratio, leading to dry mixtures. Typically, this kind of concrete is employed in the construction of roads.
Collapsed Slump
This is a sign that the concrete mix is either excessively wet or has a high workability level, in which case a slump test is inappropriate. It also indicates that the water-cement ratio is too high.
Shear Slump
The concrete needs to be retested because the shear slump suggests that the result is unsatisfactory.
Precautions in Slump Testing
The inside of the mold and its base should be moistened at the start of each test in order to lessen the impact of variations in surface friction on the slump.
Additionally, any concrete that might have mistakenly dropped in the region immediately surrounding the cone’s base should be removed before removing the mold.
Slump Values For Different Types of Work
| Type of Work | Slump (mm) |
|---|---|
| Concrete for Road Work | 25 to 30 |
| Ordinary RCC Work For Beam and Slab | 50 to 100 |
| Column, retaining walls, and thin vertical sections | 75 to 150 |
| Vibrated Concrete | 12 to 25 |
| Mass Concrete | 25 to 50 |
FAQs
Why is the slump cone test performed?
The slump cone test is carried out to record mixture characteristics, to determine the workability and water/cement ratio indirectly, or for acceptance purposes.
How is a slump cone tested?
The mold is gently raised vertically upward without disturbing the concrete cone. Later, the concrete slumps (subsidies). The distance between the slumped concrete top and the slump cone top is used to calculate the concrete’s slump.
What is the ideal value of a slump?
In the case of a dry sample, the slump will be in the 25-50 mm (1-2 inch) range. However, the slump of wet concrete can range from 150 to 175 mm, or 6 to 7 inches.
What are the 4 types of slumps?
True slump, zero slump, shear slump, and collapse slump are the four forms of a slump that might happen in a slump test.
Also, Read
What are the Properties of Fresh Concrete?
Nominal Mix Concrete Vs Design Mix Concrete
Plum Concrete – Purpose, Ratio, Specifications & Uses
Compaction Factor Test For Concrete Workability
What is Honeycomb in Concrete? Effects, Causes, Prevention & Remedy